Imagine you’re about to start cooking bacon or step into a steaming hot shower, and your trusty fan sputters, squeaks, or refuses to power on. You’re probably thinking: Do I really have to shell out for a whole new fan? Or can I just swap out the busted motor and keep everything else in place? You might be surprised to learn how many people throw out perfectly good extractor fans when the fix is just one key part–the motor. Manufacturers don’t usually want you to know this, but changing a fan motor is not as mysterious or hard as it seems. If you’re handy with a screwdriver and know how to turn off the circuit breaker, replacing the motor in a bathroom or kitchen extractor fan can be a surprisingly doable project. But there’s more to the story: safety rules, finding the right part, and knowing what could go wrong.
How Extractor Fans Work and Why Motors Fail
Extractor fans are pretty straightforward when you break them down. At their core, they have a housing (that plastic or metal box mounted in your ceiling or wall), a set of blades, and a small yet hardworking electric motor spinning the fan. The job is simple: move air and get rid of humidity, smoke, or cooking fumes. Over years of service, though, the motor is put through its paces. Dust, grease, steam, and plain old wear and tear eventually gum up the works. You’ll start to hear odd squeaks, rattles, or nothing at all. Actually, in the UK, building regulations recommend an extractor fan in most kitchens and bathrooms, and while some can run for 10-15 years, motors tend to go first. The most common failure? Worn bearings, a seized rotor, or burned-out windings – all classic signs the motor has had enough.
But here’s a fun fact: on many fans, especially the mid-range or high-end models, the main parts are built in modular layers. That means you can pull out the motor, swap in a replacement, and have the fan basically as good as new. There’s no shame in replacing the whole thing if the plastic housing is cracked or the electrics are fried, but most of the time, it’s just the motor crying for retirement. Keep this in mind too: fan motors have a power rating (often between 15 and 40 watts), and picking the wrong size can lead to either poor air flow or a burned-out replacement in no time. Before you begin shopping, snap a picture of the motor label–that model number is gold when you’re hunting down the right part.
So why do so many folks skip straight to replacing the whole extractor fan? Most don’t know they can just order a new motor, or they think wiring it up is like defusing a bomb. That’s not the case. As long as you’re careful, and follow basic safety steps, changing a fan motor is just a matter of working methodically: disconnect the mains, remove the cover, undo the old motor, and slot in the new one. You do need to keep an eye on brands, though. Companies like Manrose, Vent-Axia, and Xpelair are popular in the UK, and often use proprietary motors. Sometimes, a universal replacement will fit, but double-check the shaft size and mounting holes before clicking “buy.”
Let me share a tip: a “dead” extractor fan isn’t always the motor. Sometimes it’s a blown fuse, failed switch, bad wiring, or just filthy blades jammed up with gunk. Give it a spin by hand—if it turns freely, the problem might not be the motor at all. If it feels stiff or grinds, then, yeah, it’s time for a motor swap. And if you hear the unmistakable scent of fried electrics when it runs, don’t wait—it’s a fire risk.
Can You Replace an Extractor Fan Motor Yourself?
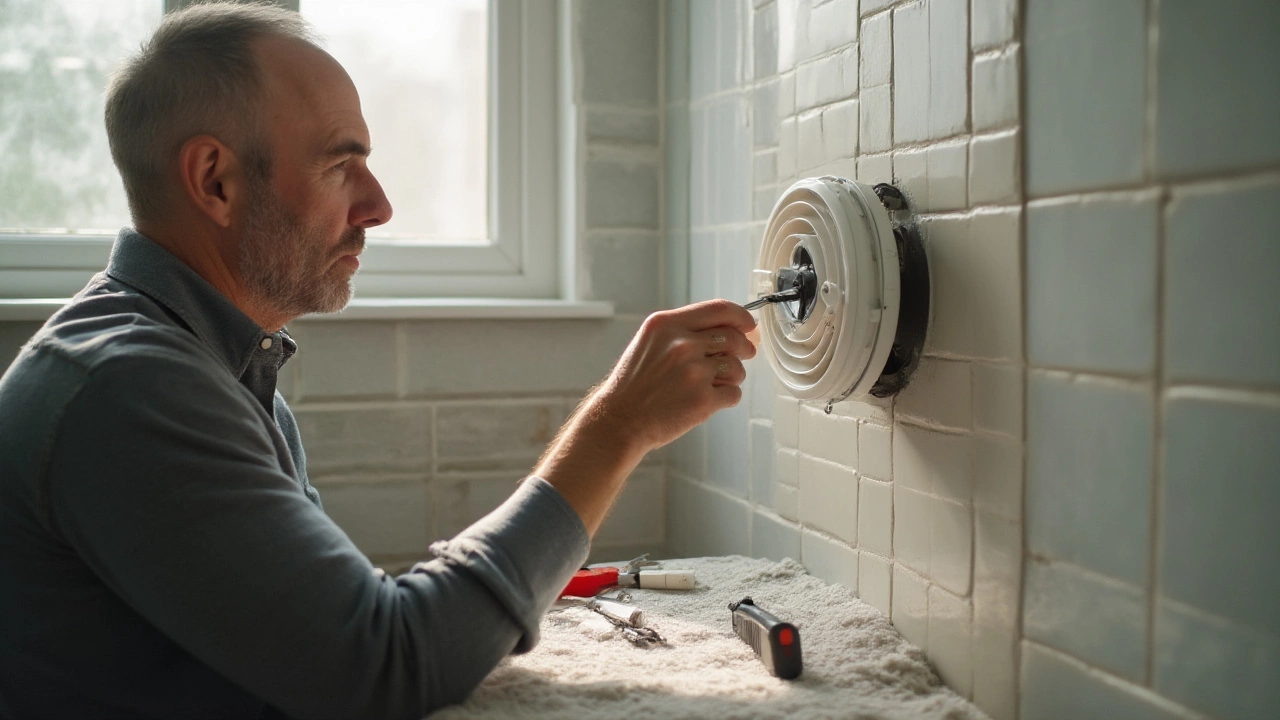
If you’ve swapped out a plug socket or light fitting, you’re already most of the way to swapping a fan motor. Most extractor fans are wired with standard 230V AC in the UK and 120V in the US. The housing stays put—you’re just dealing with that center motor module. Switch off the circuit at the breaker, double-check with a voltage tester, and you’re good to proceed. You’ll probably need a stepladder, Phillips screwdriver, possibly some needle nose pliers, and patience for dusty hands.
The first real step is access. Most extractor fans have a snap-on or screwed cover. Take it off and you’ll see the blades and, behind them, a small box (that’s your motor). On models like the Manrose XF100, you’ll spot two or three screws holding the motor assembly in. Undo those, and, with a bit of gentle tugging, the motor and blade unit will slide right out. Now, here’s where a lot of people panic: the wiring. Normally, the fan wires are simple: live (brown in the UK), neutral (blue), and possibly an earth (green/yellow). Some bathroom fans have a timer function, so you might see a second live wire for that feature. If you’re unsure, take a couple of photos first and label the wires. Never rush with electrics—it’s worth five extra minutes for safety.
With the motor and blades free, now’s a good opportunity to clean the housing—there’s probably enough dust and fluff to fill a small pillow. Order your replacement motor either by searching the fan’s model number online or heading for a reputable electrical supplier. If your fan is over ten years old, you might need to ring up the manufacturer for an exact match, or check places like eBay for older, “NOS” (new old stock) motors. Expect to pay anywhere from £12 to £40 for a bathroom fan motor, with more robust kitchen models at the higher end. And don’t forget to match the wattage and shaft style—the blade might be secured by a small grub screw or friction fit; transfer it gently to the new motor.
Installation is just the reverse. Attach the blades to the replacement motor, wire it up as per your photos, tuck the cables safely away, and screw the motor assembly back into its cradle. Give the blades a quick spin by hand to be sure nothing’s fouling up the works. Put the cover back on, turn the power at the breaker, and give it a test. You should hear a clean, steady hum—no grinding, no rattle, just a healthy fan ready for another decade or so. If it’s a kitchen extractor above a hob, run it for 10-15 minutes with the window open to burn off any new-motor smell or residual packing grease the first run. Now, if you ever hear a faint buzzing sound even when the fan is off, don’t panic; it’s probably just vibration from the housing or residual current. If the fan refuses to start, double-check the wiring or try another compatible motor.
Don’t cut corners: be sure the replacement motor really is the right fit before ordering, or you’ll waste money and time. If you live in a rented property or have an integrated extraction system with automatic humidity sensors (very common in new builds from 2020 onwards), call your landlord or a qualified electrician first—some modifications require permission or special tools. And if your fan uses a 12V low-voltage transformer, be sure the transformer hasn’t failed before blaming the motor. Aftermarket universal motors can sometimes fix tired fans, but always look for reputable reviews and a warranty.
One more pro tip: if you notice mold growing around your bathroom vent, or the kitchen hood collects grease quicker than usual, your fan might not be pulling its rated airflow anymore. Replacing the motor can give it a second wind—and help keep your air healthy and dry.

Extractor Fan Motor Replacement: Worth the Effort?
So is it worth replacing just the motor? In most cases, yes. You’ll save money, avoid disturbing the ceiling or wall, and often get a better result than with a cheap “big-box” fan replacement. A good extractor fan housing can last decades—why send it to landfill for one tired part?
Still, let’s cover a few scenarios where a full replacement might make more sense. If the plastic housing is cracked, brittle, or discolored (think yellowed with age or heat), putting a new motor in is just extending a tired fan’s life for a couple of years. New extraction fans have added features like silent running, energy-saving motors, humidity controls, or built-in LEDs. If you want those upgrades, go ahead and opt for the full replacement—it’s just a bigger project (expect to manage wiring, mounting, possibly patching, or repainting plaster around a new size opening).
But for most DIYers and anyone watching their budget, swapping motors is the smarter play. You’re controlling cost, reducing waste, and sharpening your own fix-it skills each time. Just last year, a survey from Screwfix showed that 61% of UK homeowners who attempted minor home appliance repairs (fans, lights, kitchen hoods) managed it without professional help. With extractor fans, the key is a methodical approach: document wiring, work gently, and take time finding parts.
If you need a little nudge, just look up video tutorials on YouTube by searching your specific fan model. Loads of pros (and regular homeowners) have filmed themselves doing the job step by step. You’ll spot details like how small clips hold the motor in, how to align the blades, or what to do if foam noise-dampening gaskets have perished. People sometimes forget to lube the shaft lightly—one drop of high-temp motor oil won’t hurt and can add years to your new motor’s life. Just don’t overdo it. And if you’re replacing the motor in an especially greasy kitchen extractor (the kind fitted above a cooker), wear gloves and keep a supply of paper towels handy. Cooking grease finds a way into the most unexpected places.
One last thought: older extractor fans aren’t just repairable—they’re often more robust than modern budget models. For example, classic 1980s Vent-Axia fans have metal frames and bearings you can relube, while some of today’s cheapo models are all plastic with sealed motors that just burn out and end up in landfills. If your housing or ductwork is well-made, a replacement motor refreshes it without waste. If you’re staring at a pricey bathroom remodel, replacing the fan motor is often the quickest fix short of a whole renovation. And with energy bills higher than ever in 2025, keeping your fan at peak efficiency matters more than ever—modern motors use less power for the same airflow.
So to wrap things up—not that we’re wrapping, just making it clear—yes, you can often replace just the extractor fan motor. It’s a smart, budget-friendly fix that’ll have you breathing cleaner air in no time. Just check the part numbers, double-check your wiring, and work safe. And hey, there’s real satisfaction in saving a perfectly good appliance from the skip by getting your hands a bit dirty and doing it yourself.