
Your kitchen is the heart of your home, but sometimes cooking up a storm can lead to lingering smells and unwanted smoke. That's where extractor fans earn their stripes. These trusty devices pull out the odors and steam, keeping your kitchen fresh and inviting. Yet, even the best of them can hit a snag now and then.
Ever wondered if your extractor fan woes can be fixed without summoning a professional? You might be surprised to learn that many common problems can be tackled with a bit of know-how and some basic tools. In this guide, we'll walk you through the steps to identify and resolve issues, along with tips to keep your fan running smoothly for years to come. It's simpler than you think to breathe new life into your kitchen's trusty sidekick.
- Common Issues with Kitchen Extractor Fans
- Diagnosing the Problem
- Step-by-step Repair Process
- Maintenance Tips for Longevity
Common Issues with Kitchen Extractor Fans
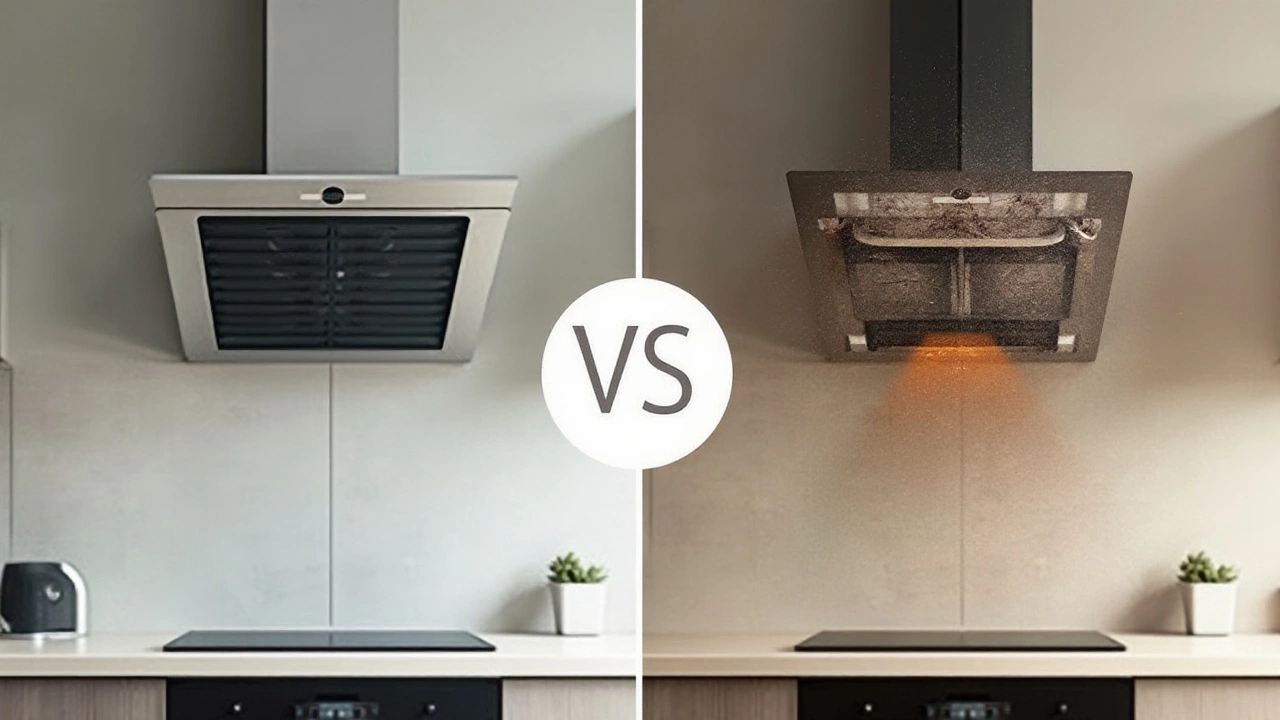
Kitchen extractor fans are invaluable, swooping in to clear out odors, steam, and smoke before they have a chance to settle. But like any frequently used device, they can encounter a few bumps along the way. One of the most common problems is the buildup of grease, which might not seem like a big deal but can significantly hinder the fan's efficiency over time. Grease not only clogs the filters but can also find its way into the fan blades, reducing their ability to rotate freely and effectively. This buildup can also create unpleasant and unpredictable noises, transforming your culinary haven into what seems like an industrial zone.
Noise is often the tip of the iceberg. Extractor fans are no strangers to electrical issues either. The wiring or motor can sometimes betray us, especially if they aren't kept in a temperate environment. A fan that won't start could mean anything from a tripped breaker to a faulty control switch. Each year, countless homeowners mistakenly write off fans that could be easily revived with a little troubleshooting. Interestingly, Consumer Reports once stated, "Regular maintenance and timely repairs can extend the life of a kitchen appliance by up to 40%." It's a reminder that sometimes the answer is just a bit of elbow grease away.
Besides the usual suspects, clogged or defective filters are another headache that frequently pops up. A filter that is saturated with grime can't purify air effectively, and you'll soon notice your kitchen becoming stuffier than usual. Replacing or cleaning the filters frequently is crucial to maintaining good airflow. This maintenance is not only about cleanliness but also about prolonging the health of the kitchen extractor fan itself. Blocked filters make the motor work harder, and this excessive strain can lead to premature wear, reducing the lifespan of the system.
Another hiccup to watch for is issues with the exhaust vent. The vent should be clear and unobstructed to allow evacuated air to disperse outside efficiently. Any sort of blockage or damage to this venting setup often contributes to reduced performance, leaving your cooking space vulnerable to the smells and pollutants that an extractor fan is meant to battle. When your fan is working at its optimum, your kitchen turns out to be not just a place to cook but a space to relax and enjoy culinary creativity without fuss.
Regular maintenance can't prevent every problem, but it can save you a lot of hassle down the road. By addressing common issues promptly, not only do you preserve the lifespan of your kitchen ventilation system, but you also enhance its day-to-day performance, keeping your culinary space fresh, pleasant, and ready for whatever delicious endeavor lies ahead. Thus, understanding these recurrent issues and how to manage them keeps your kitchen's heart beating without missing a beat.

Diagnosing the Problem
When your reliable kitchen extractor fan starts misbehaving, it can feel like your kitchen's whole environment is thrown out of balance. Before leaping to any conclusions, it pays to spend some time pinpointing the exact issue. This process not only saves unnecessary costs but also arms you with the right approach for repair. The first step in diagnosis is to pay attention—really listen—to what the fan is telling you. Is it producing unusual noises, like grinding or rattling? This could indicate a mechanical problem, such as a loose or damaged fan blade. When a fan is making noise, it's often battling against misaligned parts or debris stuck in the machinery. Occasionally, an electrician will note that "the sound of a fan can be as precise as a heartbeat, telling you everything about its current condition."
Next, check if your kitchen ventilation is poor or if the fan is barely extracting air. This inefficiency often ties back to blockages in the ducts. Clogged ductwork from grease build-up or debris might be the culprit. Turn off the fan, unplug it, and take a look. Feel around for any obstructions, and note the presence of grime. A fan struggling to move air will show signs of a system choking and indicates a need for a thorough cleaning. Don’t forget to inspect the filters while you’re at it. Old or clogged filters drastically reduce efficiency. If a filter looks like it's seen better days, a replacement might be necessary.
On the electrical front, if the fan refuses to turn on or powers intermittently, the problem might lie within the circuitry. Examine the fan's power connection and ensure nothing is loose or frayed. Check the wall switch and see if there's any response when toggled. A multimeter can be a handy tool in this situation to test the continuity and voltage. This valuable information can guide you toward whether it’s a simple fix or something that warrants professional intervention. By rolling up your sleeves and diving into these diagnostic steps, you’ll come closer to bringing back the full functionality of your kitchen extractor fan.
It's also worth noting that sometimes the problem can be external. Consider the placement of your kitchen extractor fan. Is it located too far from the cooking zone or perhaps too close to a wall that might restrict airflow? Sometimes fans are installed in suboptimal spots that impact their performance over time. Adjusting its positioning might sound daunting but it could be the sweet spot between mediocre and optimal airflow. Always remember, diagnosing isn’t just about finding a fault—it's about understanding the system and getting to know your appliance more intimately. This knowledge empowers you to handle current issues and any potential future hiccups with confidence.

Step-by-step Repair Process
Embarking on the journey to repair your kitchen extractor fan doesn't just restore its functionality; it turns you into a hands-on home hero. First, it’s crucial to identify the specific problem. Typical issues include the fan not turning on, unusual noises, reduced airflow, or unpleasant odors lingering despite its operation. Start by flipping the power switch to make sure the issue isn't simply a tripped circuit. If you've dived headfirst into fixing without ensuring this, you could be spinning your wheels. Ensuring that the power supply isn't the culprit saves time and perhaps a bit of embarrassment.
If power isn't the issue, it's time to pop the hood, so to speak. Before doing anything else, disconnect the power source to avoid any electrical shocks. Remove the cover of the fan by loosening the screws or clips. This will give you access to the internal components and allow you to look for obvious issues, such as a loose wire or obstructions from grease buildup. Often, using a damp cloth can clear away layers of grease that cause reduced efficiency. Once cleaned, if the problem isn't solved, move to check the motor.
Inspecting and Cleaning the Motor
The motor is the heart of any fan maintenance. If it’s malfunctioning, so will the fan. With the cover removed, gently rotate the fan blades by hand. Do they spin freely? If not, the bearings might be worn out, or there could be something jamming them. A bit of light machine oil can sometimes work wonders on stiff bearings. If access to oiling points is restricted, consider calling in extra help unless you're comfortable disassembling further. However, if the blades don't budge even with gentle force, avoid exerting pressure; it's a sign that something internal may need professional attention.
Next, an electrical multimeter can come in handy. With this device, you can check continuity in the motor's wiring. Sometimes, wires can disconnect or wear out over time. A continuity test will confirm if electric flow is maintained across the motor's wiring. In a rare moment of clarity, an HVAC technician once said,
"A continuity test is like checking a heartbeat; if there's no pulse, it's time to look deeper."This simple test can allow even the untrained hand to make insightful decisions about further actions needed.
Checking the Ventilation Paths
If your fan seems to operate well but lacks efficiency, you may be dealing with a ventilation issue. The ventilation channels could be blocked or restricted, leading to a struggling fan. Check the ducts connected to the extractor fan. Ensure there are no build-ups or obstructions. Sometimes, birds nesting or debris accumulation can significantly impact the airflow. Use a flashlight to look as far into the duct as you can. Should you spot anything suspicious, a gentle prodding with a long stick or similar rig could save you hours of frustration.
| Common Blockages | Tools to Clear |
|---|---|
| Grease Build-up | Degreaser and Cloth |
| Nesting Materials | Long Stick or Wire |
| General Debris | Vacuum Hose |
After performing these checks, reassemble your fan, taking care to attach all parts securely. Once everything is back together, power up your fan for a test run. If it hums along smoothly and inhales as expected, you’ve successfully tackled an essential home repair task. Congratulations on your victory! However, if the problem persists or new issues surface, it might be time to consult professionals to avoid further complications.
Maintenance Tips for Longevity
Ensuring your kitchen extractor fan stands the test of time involves a bit of routine care and attention. While these devices are built to tackle waves of steam and cooking residues, they need occasional tending to perform at their best. First and foremost, it's vital to clean the filters regularly. Grease filters can become clogged over time, reducing the fan's efficiency. A good rule of thumb is to wash metal filters every few months using warm, soapy water, or pop them in the dishwasher if they're dishwasher-safe. Activated charcoal filters, however, should be replaced about every six months, as their ability to absorb odors diminishes. Keeping these components fresh ensures that your fan continues to effectively ventilate your space.
It's also crucial to check the ductwork and vent openings periodically. Dust and debris can accumulate in the ducts, impacting airflow and potentially causing overheating if left unattended. A simple vacuuming or wiping down of these parts can make a world of difference. Inspect the fan blades too, as they can gather grease and dust. Carefully remove and clean them with a soft cloth and mild detergent. When reassembling, ensure all parts are securely fastened to avoid any rattling noises when the fan is operational.
Maintaining the Motor
The motor is the heart of your extractor fan, so its upkeep is paramount. While modern fans have motors that are typically sealed and require minimal intervention, it doesn't hurt to listen for unusual sounds that might indicate wear or tear. If you notice anything concerning, you may need to lubricate the motor bearings, if they're accessible, to keep it in good working order.
"Routine maintenance not only extends the lifespan of the appliance but also contributes to its energy efficiency," advises Michael Plummer, a home appliance expert from A.J. Madison.By keeping the motor in prime condition, you're ensuring that the fan operates smoothly and quietly.
As part of your maintenance routine, don't forget to inspect the electrical connections. Loose connections can cause intermittent functioning or even overheat the unit. Ensure all wires are securely attached and look for signs of wear, such as broken insulation or burning odors, which might indicate a need for replacement.
Regular Professional Checks
While DIY maintenance can cover a lot, occasional professional inspections can catch issues before they become serious problems. An expert can provide a thorough checkup, especially if your fan is part of a complex ventilation system. Often, these checks come with adjustment services that fine-tune all components, maximizing efficiency and safety. This type of preventive care is worth considering every couple of years, particularly if your system sees a lot of use. Investing time in care and maintenance ultimately pays dividends in performance and cost savings, keeping your kitchen ventilation reliably effective. Remember, a little effort now can forestall significant repairs down the road, maintaining the harmony of your kitchen atmosphere.